Deploying your CA's root certificate

In my previous article, we implemented
a Certificate Authority (CA) using openssl commands.
To become a real CA, you need to get your root certificate on all the devices in the world. But we don’t need to become a real CA. We just need to be a CA for the devices you own. We need to add the root certificate to any laptops, desktops, tablets, and phones that access your HTTPS sites. This can be a bit of a pain, but the good news is that we only have to do it once. Our root certificate will be good until it expires.
For client side authentication, you only need to install the root certificates to the servers that will be doing the client validation.
Deploying the root certificate will vary for different Operating systems and sometimes different browsers.
Linux
There are so many Linux distributions, but Ubuntu is by far the most popular, therefore these instructions will cover Ubuntu.
- If it isn’t already installed, install the
ca-certificatespackage.sudo apt-get install -y ca-certificates - Copy the
myCA.pemor/home/root-ca/certs/ca.cert.pemfile to the/usr/local/share/ca-certificatesdirectory as amyCA.crtfile.sudo cp ~/certs/myCA.pem /usr/local/share/ca-certificates/myCA.crt - Update the certificate store.
sudo update-ca-certificates
You can test that the certificate has been installed by running the following command:
awk -v cmd='openssl x509 -noout -subject' '/BEGIN/{close(cmd)};{print | cmd}' < /etc/ssl/certs/ca-certificates.crt | grep Hellfish
Windows 10
- Open the “Microsoft Management Console” by using the
Windows + Rkeyboard combination, typingmmcand clicking Open - Go to File > Add/Remove Snap-in
- Click Certificates and Add
- Select Computer Account and click Next
- Select Local Computer then click Finish
- Click OK to go back to the MMC window
- Double-click Certificates (local computer) to expand the view
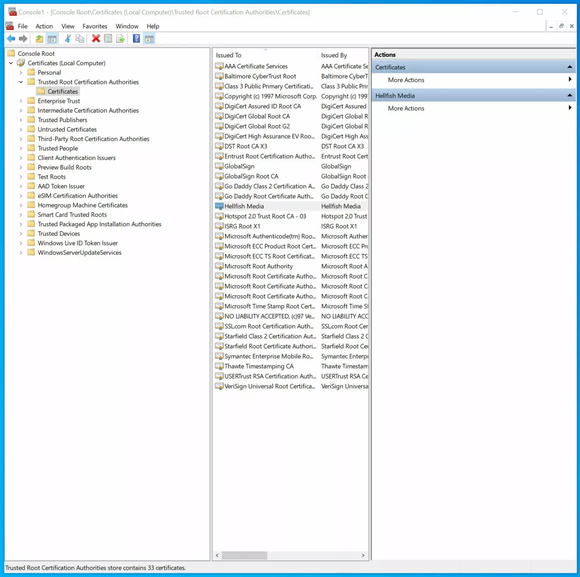
- Select Trusted Root Certification Authorities, right-click on Certificates in the middle column under “Object Type” and select All Tasks then Import
- Click Next then Browse. Change the certificate extension dropdown next to the
filename field to All Files (.) and locate the
myCA.pemfile, click Open, then Next - Select Place all certificates in the following store. "Trusted Root Certification Authorities store" is the default. Click Next then click Finish to complete the wizard.
If everything went according to plan, you should see your CA certificate listed under Trusted Root Certification Authorities > Certificates.
iOS 14
On iOS devices you can do so fairly easily by following these steps:
- Email the root certificate to yourself, so you can access it on your iOS device. Make sure to use the default Mail app to access the email.
- Tap on the attachment in the email on your iOS device. It will prompt you to review the profile in the Settings app.
- Open the Settings app and click Profile Downloaded near the top.
- Click Install in the top right, and then Install again on the Warning screen.
- Once installed, hit Close and go back to the main Settings page.
- Go to General > About.
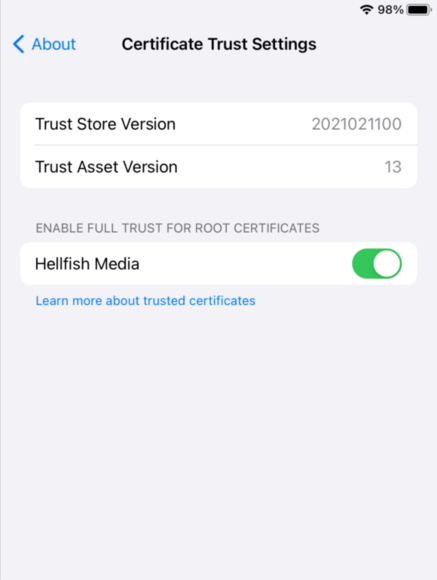
- Scroll to the bottom and click on Certificate Trust Settings.
- Enable your root certificate under “ENABLE FULL TRUST FOR ROOT CERTIFICATES”.
Authenticating clients
If you are using certificates to validate clients, you only need to install your
root certificate myCA.pem. Depending on your web browser, this might vary.
Authenticating clients with nginx
Authenticating clients with nginx, you need to enable TLS first.
server {
    listen              443 ssl;
    server_name         myserver.internal.net;
    ssl_certificate     server.crt;
    ssl_certificate_key server.key;
    ssl_protocols       TLSv1.2 TLSv1.3;
    ssl_ciphers         HIGH:!aNULL:!MD5;
    # ...
}
Configure Nginx to require clients to authenticate with a certificate issued by your CA To tell Nginx to use mutual TLS and not just one-way TLS, we must instruct it to require client authentication to ensure clients present a certificate from our CA when they connect.
In your server's configuration block, specify the location of your CA root certificate to use for authenticating client certificates. You may choose to make client verification optional so your application can return a 403 message:
server {
    listen                 443 ssl;
    server_name            myserver.internal.net;
    # ...
    ssl_client_certificate /etc/nginx/client_certs/myca.crt;
    ssl_verify_client      optional;

    # ...

    location / {
      if ($ssl_client_verify != SUCCESS) {
        return 403;
      }
    # ...
}
Note that in this example ssl_verify_client is set to optional. This allows you to
control what parts of the server need to be authenticated using certificates, and
also lets you return 403 error http code.
Authenticating clients with apache
In your Apache configuration file add the following:
SSLVerifyClientSSLVerifyDepth 10SSLCACertificateFile /path/to/cert/selfsigned-ca.crt
Restart apache.
Testing client certificates
To test this using the command line, you can use curl, for exampe:
curl -v --cert client.crt.pem --key client.key.pem https://sample.domain.tldYou can also open the URL in your browser and you will be prompted to select a client certificate for authentication. Depending on your browser and system, you might have to import the client certificate into the system's (or browser's) certificate store first.
Create the client keys as described in a previous article.
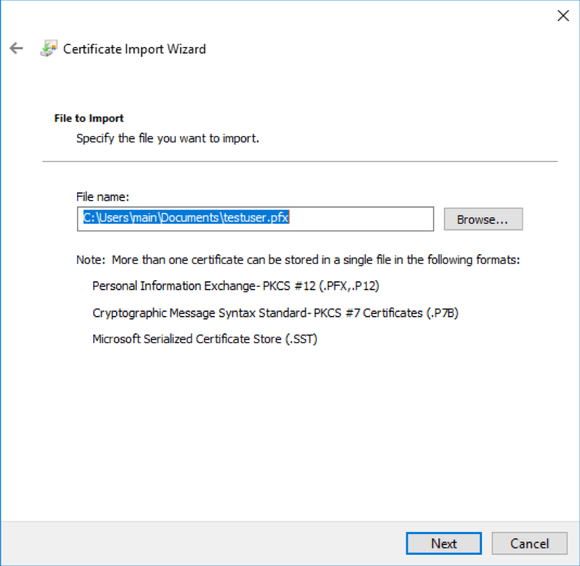
For Windows clients, the key material can be combined into a single PFX. You will be prompted for the passphrase you set above:
openssl pkcs12 -export -out testuser.pfx -inkey testuser.key -in testuser.crt -certfile myca.crtThis includes the public portion of your CA’s key to allows Windows to trust your internally signed CA.
Importing the Client certificate onto a Windows machine
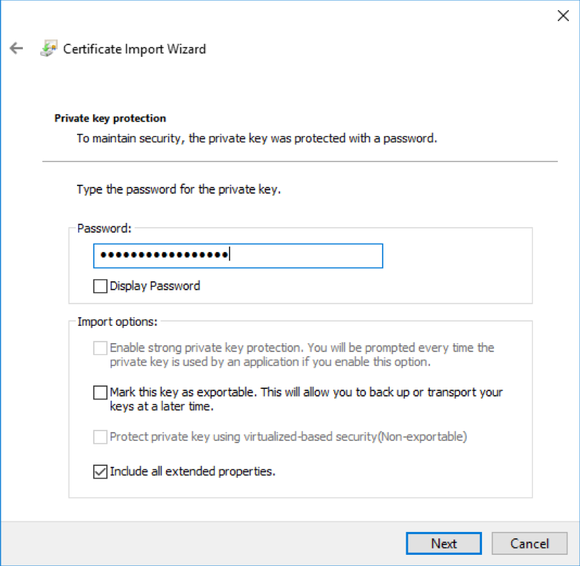
Double click the .PFX file, select “Current User”.
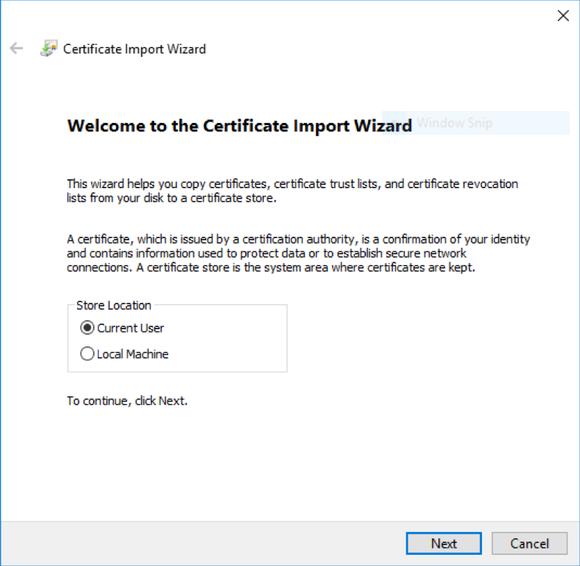
If you set a passphrase on the PFX above, enter it here. Otherwise, leave blank and hit next.
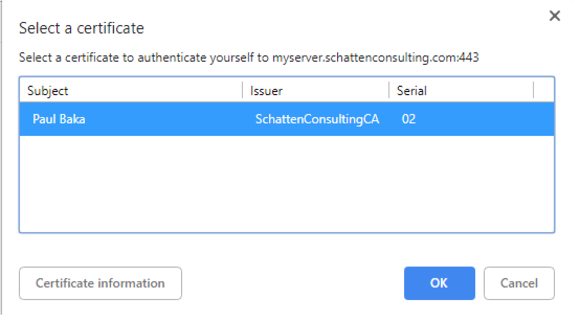
Next, add the site in question to "trusted sites" in Internet Explorer. This will allow the client certificate to be sent to the site for veritifcation. (Trusting it in Internet Explorer will trust it in chrome as well).
When you next visit the site, you should be prompted to select a client certificate. Select "OK" and you’re in!
Firefox
Firefox has its own certificate store. In my version, go to about:preferences#privacy,
scroll to the Certificates section, click "View Certificates...", and on the
first tab (Your Certificates), click Import. Select your .p12 file, enter the
password, and it will be added.
Chrome based (Chromium, Brave) on Linux
On my debian, I have to import client certificate into storage:
pk12util -d sql:$HOME/.pki/nssdb -i certs/johnsmith.p12Chrome based (Chromium, Brave) on Windows
Just double-click on certificate file in explorer, and go everything default.
References
- https://deliciousbrains.com/ssl-certificate-authority-for-local-https-development/#installing-root-cert
- https://nginx.org/en/docs/http/ngx_http_ssl_module.html#ssl_trusted_certificate
- https://nginx.org/en/docs/http/ngx_http_ssl_module.html#ssl_verify_client
- https://nginx.org/en/docs/http/ngx_http_ssl_module.html#var_ssl_client_cert
- https://httpd.apache.org/docs/2.4/ssl/ssl_howto.html#allclients
- https://knowledge.digicert.com/tutorials/gatekeeper-p12-certificate-installation-method