Using sphinx for doc generation
![]()
I have started using sphinx for documention generation.
I do find sphinx quite prickly with the slightest mistake breaking things and error messages that are very uninformative or confusing.
Nevertheless, it is quite close to feature complete.
Introduction
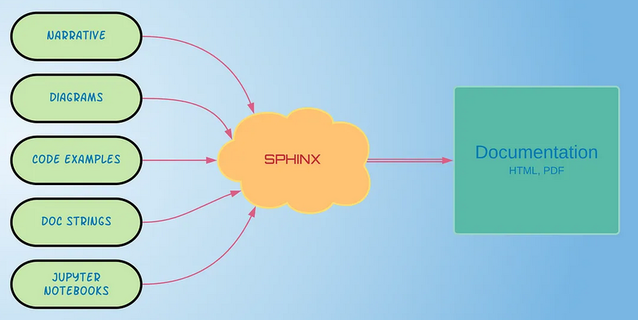
Sphinx is a documentation generator written and used by the Python comunity. It is written in Python, but it can be also used to document projects written in other languages.
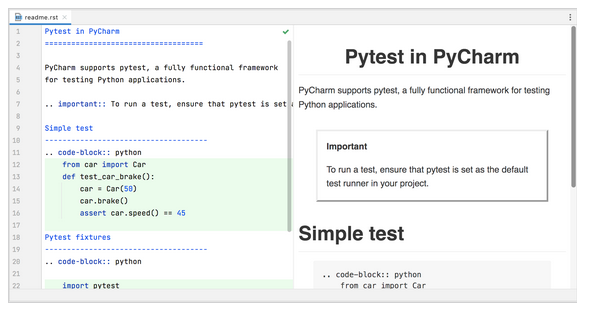
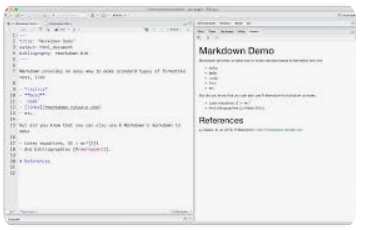
By default, it uses reSturcutredText but it there are extension to allow for Markdown compatibility.
It can generate output in multiple formats. Among others it supports:
- HTML (in different configurations)
- EPub
- Man pages
Basic functionality
If you are using the default functionality you only really need the sphinx
Python package.
In this scenario, you must write all your documentation in reStructuredText and use apidoc extension. Note, there is also an extension named autodoc. This is NOT the one you want, as it requires that you manually write reStructuredText files pointing to your source code. The apidoc extension, makes use of the autodoc extension and creates any needed reStructuredText files that may be needed. The limitation of apidoc is that it is hard-coded to always generated reStructuredText, so it can not be used for Markdown documentation.
Sample Usage
As mentioned earlier, sphinx is quite prickly, so this is the configuration I arrived at after a lot of trial and error.
sphinx has a sphinx-quickstart command which is meant to set things up
for you. I prefer to do this manually.
First of all, I assume that you have a project directory with a structure like this:
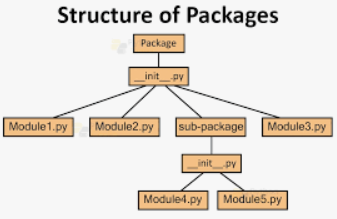
your_package
│── your_package/                # Main package directory
│   ├── __init__.py              # Makes it a Python package
│   ├── module.py                # Your actual Python code
│── setup.py                      # Installation configuration
│── requirements.txt              # Optional: Dependencies list
│── README.md                     # Optional: Project info
To this I add a directory docs so the structure looks like:
your_package
│── docs/                        # Sphinx documentation directory
│── your_package/                # Main package directory
│   ├── __init__.py              # Makes it a Python package
│   ├── module.py                # Your actual Python code
│── setup.py                      # Installation configuration
│── requirements.txt              # Optional: Dependencies list
│── README.md                     # Optional: Project info
For document generation we require the following Python packages:
- docutils : not really needed as it is a dependancy for sphinx
- sphinx : main documentation generator
- sphinx-autodoc2 : automatic documentation generation from source code
- myst-parser : Markdown parser for sphinx
- linkify-it-py : Dependancy for myst, adding convenient auto URL conversion.
- sphinx-argparse : Used to document command line parsers
For convenience, I add this to my docs/requirements.txt file, since these
are dependancies for doc generation and not for the package itself.
In docs, I create the files: Makefile, conf.py, index.md, make.bat.
docs/Makefile and docs/make.bat
The main items to pay attention in these two files are:
SOURCEDIR = .
This tells sphinx that current directory (docs) is where the documentation source files are.BUILDDIR = _build
Sets-up the direction_buildto be the output directory.
It is a good idea to add _build to the .gitignore file in docs.
docs/Makefile
docs/make.bat
docs/conf.py
This is where most of the sphinx relevant settings reside. This is what I am using:
This config file is loading version information from the module itself. Other meta-data can be set here.
The following extensions are enabled:
- autodoc2 : generate documentation from doc strings
- myst_parser : Markdown
- sphinxarg.ext : Generate documentation from argument parser
- sphinx.ext.doctest : Enable doctest unit tests.

autodoc2
autodoc2_packages: configures what source directories to find doc stringsautodoc2_render_plugin = 'myst': We use markdownautodoc2_sort_names = True: keeps names sorted. Otherwise the order is random.autodoc2_hidden_objects = {'inherited','private'}: hides inherited classes and names that begin with a single underscore.
myst_parser
myst_enable_extensions: Enable extensions:fieldlist: Enables the use of:key value:in doc stringslinkify: Converts raw URLs into linkssubstitution: Lets you configure Jinja2 style substitutions. See:myst_substitutions.strikethrough: Enables~~markup.
sphinx.ext.doctest
Enables unit tests in documentation. Use:
doctest_global_setupanddoctest_global_cleanupto configure the execution environment
docs/index.md
This is the main page for the generated HTML documentation. Example contents:
In this example, we are using Jinja2 style substitutions. These are defined
in the conf.py file in the myst_substituions dictionary. Then, they
are refered in the document as {{ key }}.
The {toctree} structure is used to create a navigation tree.
The files listed there are the entry points for the documentation. These files are created as Markdown or possibly reStructuredText and reference here.
Important to note is the apidocs/index. This file is generated automatically
by the autodoc2 extension.
In this example, we are also referencing a file cli.md. We are using this
to document command line arguments.
docs/cli.md
This file is used by index.md and is used in the command line documentation.
Example content:
See argparse usage on more details on how argparse is used.
Docstrings
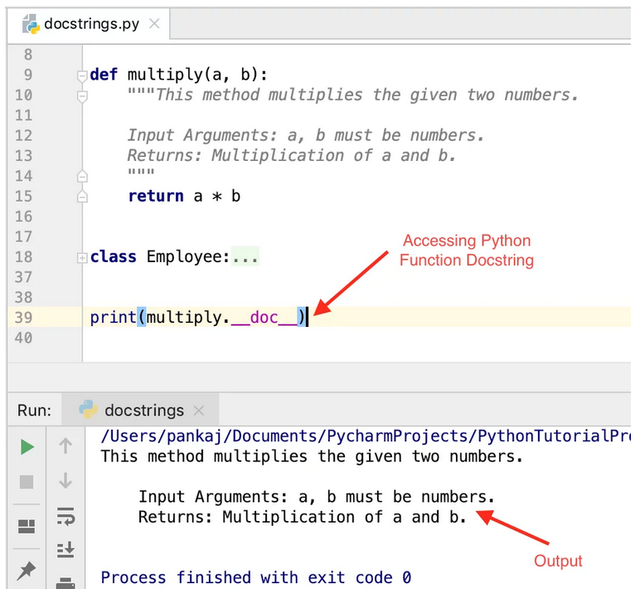
In your source code you can then use docstrings. Here is an example:
The example uses:
- `:param type varname: to document parameters to the function
- `:returns: to document the return value
- It makes use of
doctestto document examples and/or execute tests.
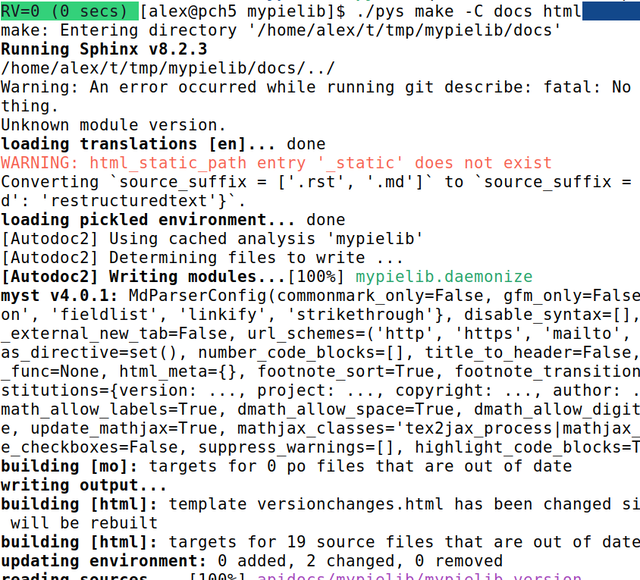
Generating documentation
In the docs directory you can:
make html: to generate HTML documentation. This will be placed in_build/html.make man: To generate a man page. This will be placed in_build/man
Publish to gh-pages

If your project is hosted on [github][gh], you can publish the documentation directly to github-pages using a [github-action][action].
Enable this by navigating to your project settings. Click on Pages on the left sidebar.
Change the Source to GitHub Actions.
Create the following workflow in .github/workflows/gh-pages.yml.
on:section: what triggers the workflow to run- pushing to the default branch
workflow_dispatchlet's you manually run the workflow from the Web UI's actions tab.
- Jobs:
- build: Use sphinx to generate documentation
- Checkout : Uses
fetch-depth: 0to make sure we get tag data. - Setup Python : sets up python, enabling
pipcaching. - Install dependancies : uses the
docs/requirements.txtfile. - Generate sphinx documentation : Run sphinx with the HTML target
- Afterwards, an artifact containing the web site is generated
- Checkout : Uses
- deploy: This job is only run from the default branch and actually deploys the web site to github-pages.
- build: Use sphinx to generate documentation
After the first succesful run, clock on the gear widget next to your About repository web part. Click Use your GitHub Pages website.
Conclusion
This article covers using sphinx as a document generator for Python projects and the eventual publishing of such documentation to github pages. This particular tutorial is geared towards using Markdown as the markup dialect instead of reStructured Text as I personally find Markdown easier to write.