Telekom Cloud CI/CD demo
At work, I got asked to do a demo for a simple CI/CD pipeline on the Open Telekom Cloud. Since it was short notice, I kept it simple and used the web console to set things up. In the future, a Terraform script would have been more re-usable, but I did not have enough time.
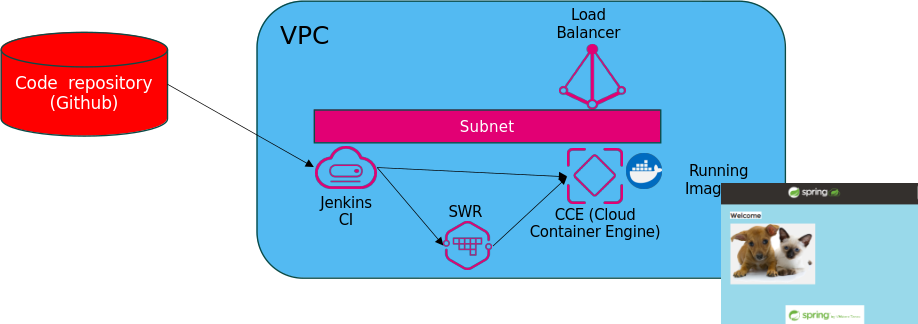
The created CI/CD infrastructure is made of the following:
![]()


- Code Repository: Hosted on GitHub
- Jenkins CI : Hosted on Telekom Cloud VM
- GitHub Integration (plugin)
- SWR for Containers
- Cloud Container Engine
- K8s Master
- Compute Nodes
- Shared Load Balancer
Architecture:
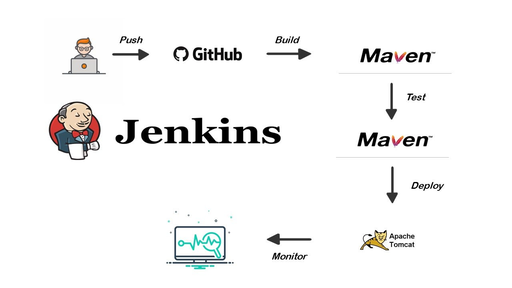
When implemented the CI/CD pipeline looks as follows:
- Trigger: code commit
- Prepare for build
- Build Java components via Maven
- Build Docker Image
Push image to SWR - Deploy Image to running Pod
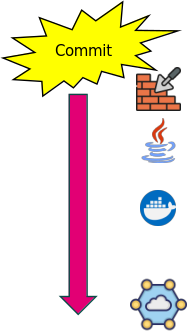
Additional tasks can be added such as Static code analysis and linting, Unit tests, Integration tests, Static application security testing, vulnerability scanning, etc.
Pre-requisites
- SSH key-pairs to login.
- Go: Service List → Computing → Elastic Cloud Server
- Click: Cloud Server Console ... Network and Security ... Key Pair
Preparation
To keep things clean, the first thing I like to do is:
- Create a tag for reporting.
- Go: Service List → Management & Deployment → Tag Management Service
- Click: TMS ... Predefined Tags
- Click: Create Tag
- NOTE: The pre-defined tag list doesn't seem to be honored in all possible scenarios.
- Create a project for isolating resources.
- Go: Service List → Management & Deployment → Identity and Access Management
- Click: IAM ... Projects
- Click: Create Project
- Create an access group scopped to the project.
- Go: Service List → Management & Deployment → Identity and Access Management
- Click: IAM ... User Groups
- Click: Create User Group
- Select the new group and click Authorize.
- Select Policy/Roles:
- Tenant Administrator : I suspect this is the only needed one.
- The following are used by the Full admin role, while I have not tested them
are not needed:
- Agent Operator
- Security Administrator
- Click Next and select the Scope. Change to Region-specific projects and select the project as created in the previous step.
- Click Ok to confirm.
- Create an account scoped for the given project.
- Go: Service List → Management & Deployment → Identity and Access Management
- Click: IAM ... Users
- Save the Login Link for later:
- Click Create User
- Fill-in:
- Username
- Description
- Access Type:
- Programmatic access
- Management console access
- Credential Type:
- Password
- Set now
- untick Require password reset at first login
- Click Next add the user group created in the previous step.
Base infrastructure
- Create VPC
- Go: Service List → Network → Virtual Private Cloud
- Create VPC. Don't forget to add tags.
- Configure the first subnet and add a tag for it.
- Click Network Console → Access Control → Security Groups
- Click Create Network Security Group, and use the template for General-purpose web server.
- Modify the new network security group. For Jenkins we need to add ports 8080 and 50000.
- Create Jenkins CI host
- Go: Service List → Computing → Elastic Cloud Server
- Click Create ECS
- Select the project from Region.
- Select flavor. I suggest a
General-purposeflavor as these are the most cost-effective. - For the image, I used: Public Image : Ubuntu : 22.04_latest.
- System disk: Used the default
High I/Osetting, but changed the size to around100GBfor this example. - Pick the network and network security group created in the previous step.
- EIP set to Auto assign.
- Select the Key Pair to use. And click Advanced Options to apply tags.
- For this demo we are using a single VM for Jenkins CI host. We use EIP so that the VM can received Web Hooks from GitHub. Since Jenkins is Java based I would recommend at least 4GB of memory.
- Make sure there is sufficient storage. Set the system disk to be at least 16 GB or more.
- It is recommended to create a suitable DNS record. Otherwise you would need to use IP addresses.
- After the VM is created you can use the SSH keys to log in. The default user
name is
ubuntu. - Install Java dependancies:
- openjdk-17-jdk-headless openjdk-17-jre-headless maven
- In this example we are using Java v17 because some dependancies on the selected applications.
- Install kubectl
- Install and configure Jenkins.
- Also install these additional packages:
- docker.io plus cgroupfs-mount debootstrap rinse pigz elfutils
- Add the
jenkinsuser to thedockergroup:adduser user group- The Jenkins service may need to be restarted.
- Retrieve initial password from:
/var/lib/jenkins/secrets/initialAdminPassword
- Create cloud container engine cluster
- Go: Service List → Computing → Cloud Container Engine
- Click Create Cluster
- Type: CCE Standard Cluster
- Enter Cluster Name
- Cluster Scale: 50 nodes
- Master Nodes: Single
Make sure these two settings are set to 50 and Single so that you get a free of cost set of master nodes. - Select the VPC and Subnet created in a previous step.
- Network Model: VPC Network
Read Network model comparison for explanation, but the TLDR is:- VPC Network: Has low overhead but only scales up to small-medium networks.
- Tunnel Network: Has higher overhead (thus lower performance) but can scale to large networks.
- Select Advanced Settings to configure relevant tags.
- Add-Ons configuration can be left on defaults.
- Add a node to the cluster by clicking on the Create Node link.
- Specifications: Change to a suitable side for the cluster nodes.
- OS: I am using Ubuntu 22.04 as that is what I am personally familiar with.
- Login Mode: Select a key from the available key pairs. You can use the
private key to log in to the cluster node (use
ubuntufor the user name due to using the Ubuntu 22.04 image). - Network Settings, change EIP to Auto create but make sure that the Line is set to Dynamic BGP and Bandwidth to 1.
- Select Advanced Settings to configure relevant tags.
- In the Advanced Settings you can add additional commands to run pre or post K8s installation.
- Conveniently you can create more than one node here by adjusting the quantity at the bottom of the page.
- Create Software Repository for Containers
- Go: Service List → Application → Software Repository for Container
- Click Create Organization
- Create a Long-Term valid login command.
At this point we have all the infrastructure needed.

Notes
This was all done from the web console. Ideally all this should have been generated via Terraform scripts.
We are creating a VM to run Jenkins. This could be replaced with a Jenkins Pod on the K8s cluster with external executors as K8s pods. Initially I did not do it like that because of my dependancies on docker for the application build process. However you can use tools like the ones listed here or there and still perform the builds from a running K8s pod. To create dynamic executor from K8s pods you need the Kubernetes plugin.
For simplicity I am using Compute nodes with EIPs. Probably it should be more secure to remove the EIPs and use a NAT gateway if the compute nodes need to download packages from external repositories.
Sample Workload
To test that the infrastructure is working, we can deploy a sample workload:
- Go: Service List → Computing → Cloud Container Engine
- Click the name of the target cluster to access the cluster console.
- In the navigation pane, choose Workloads. Then, click Create Workload.
- Configure the following parameters and retain the default value for other parameters:
- Basic Info
- Workload Type: Select Deployment.
- Workload Name: Set it to nginx.
- Namespace: Select default.
- Pods: Set the quantity of pods to 1.
- Container Settings
Enter nginx:latest in the Image Name text box. - Service Settings
Click the plus sign (+) to create a Service for accessing the workload from an external network. This example shows how to create a LoadBalancer. Configure the following parameters in the window that slides out from the right:- Service Name: Enter nginx. The name of the Service is exposed to external networks.
- Service Type: Select LoadBalancer.
- Service Affinity: Retain the default value.
- Load Balancer: If a load balancer is available, select an existing load balancer. If not, select Auto create to create one.
- Ports:
- Protocol: Select TCP.
- Service Port: Set this parameter to 80, which is mapped to the container port.
- Container Port: port on which the application listens. For containers created using the nginx image, set this parameter to 80. For other applications, set this parameter to the port of the application.
- Basic Info
- Click Create Workload.
Wait until the workload is created.
The created Deployment will be displayed on the Deployments tab.
Accessing Nginx
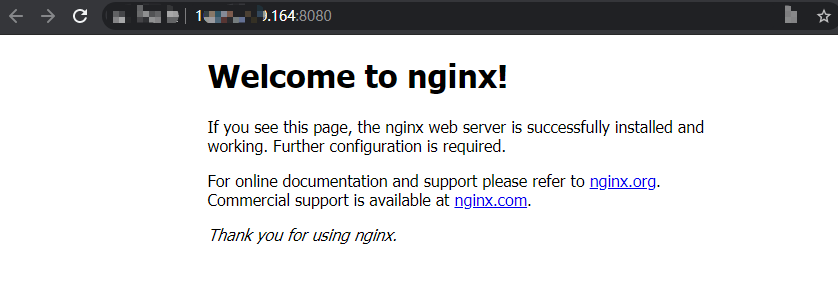
- Obtain the external access address of Nginx.
Click the Nginx workload name to enter its details page. On the page displayed, click the Access Mode tab, view the IP address of Nginx. The public IP address is the external access address. - Enter the external access address in the address box of a browser. The following shows the welcome page if you successfully access the workload.
Notes
For this demo we are letting CCE create the load balancer. And the load balancer rules
are then managed directly by it. Probably creating the load balancer should be done
via Terraform but I have not tried this. In theory you could use kubectl to
create the service as described here.
Code Repository
For this demonstration we are using a github hosted code repository. Since our customer made use of the Spring Framework I chose to use the Spring Petclinic example application. Note that this example is interesting as there is a github org containing different variations of the petclinic, such as different frontends, microservices architecture, clouds, etc.
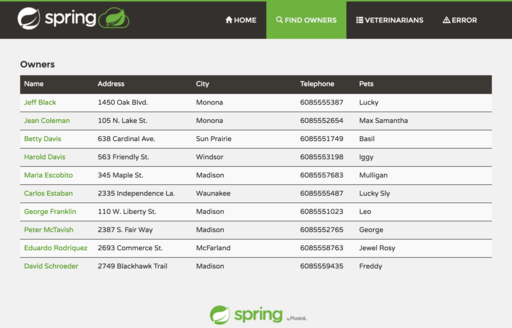
Create your code repository in github. You can do this by either doing a Fork of the Spring Petclinic application or using the Import functionality. The difference between the two is that Forking will keep the link between the original repository and your new repository, whereas importing will keep the two repositories independant. For the demo I chose to import.
After creating the code repository link it to Jenkins CI:
- Navigate to your code repository.
- Click on the Settings tab.
- On the navigation pane, go to Webhooks and click on Add webhook.
- Payload URL : jenkins url
/github-webhook/e.g.http://demo240619-ci.otc1.cloudkit7.xyz:8080/github-webhook/ - Content type : application/json
- Payload URL : jenkins url
This will trigger the webhook whenever changes are comitted.
Setting up Jenkins
Browse to the Jenkins CI web page. It defaults to port 8080. You will need the password from:
/var/lib/jenkins/secrets/initialAdminPassword
I configure the following plugins:
- Dashboard View - nice dashboard view.
- Credentials Binding - Needed to use credentials
- Git
- GitHub
- Locale - Enabled this because otherwise things show as being partially translated.
I did not test these, but seem useful:
- Config File Provider - Use it to store
kubectlconfig? - Embeddable Build Status - add badges to your repos?
- Warnings - Extract warnings or issues from different tools
- Git Parameter - choose branches, tags or revisions
Let the set-up wizard run.
Create the first admin user. Modify the Jenkins URL if necessary. You may need to change the Jenkins URL if running behind a reverse proxy.
Creating pipeline
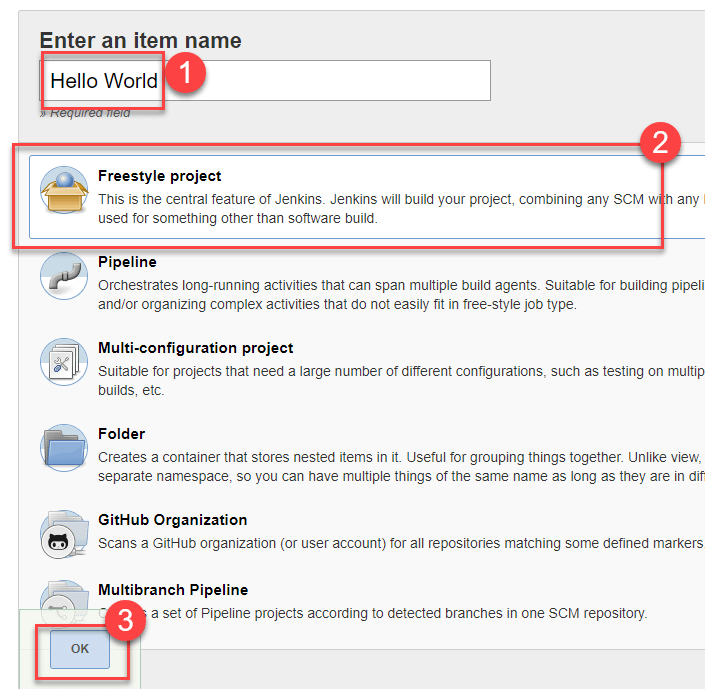
Go to the Jenkins CI main page and Click New Item:
- Enter an item name
- Select Frestyle project
Configure:
- GitHub project
- Enter Project url
- Source Code Management
- Choose Git
- Enter Repository URL. Add credentials if needed.
- Build Triggers
- GitHub hook trigger for GITScm plling
- Build Environment → Enable Use secret text(s) or file(s)
- Add Secret File: Use this to include the
kubeconfigfile. - Add Username and password (separated): Use this to include docker push credentials
and bind to
SWR_USERandSWR_PASSWD.
- Add Secret File: Use this to include the
Build steps
For the build steps I am just using shell scripts.
- Common vars
cat > vars.sh <<-_EOF_ swr=swr.eu-de.otc.t-systems.com org=demo240619 app=spring_petclinic ver=3.3.0 k8sid="spring-petclinic1" _EOF_ - Maven build
./mvnw clean package -Dmaven.test.skip=true - Image build
(set +x ; docker login -u "${SWR_USER}" -p "${SWR_PASSWD}" $swr ) docker buildx build -t $app:$ver-$BUILD_NUMBER . docker tag "$app:$ver-$BUILD_NUMBER" "$swr/$org/$app:$ver-$BUILD_NUMBER" docker push "$swr/$org/$app:$ver-$BUILD_NUMBER" -
Update running pods
k8scmd="kubectl --kubeconfig=$KUBECFG"
$k8scmd config use-context internal
if [ -z "$($k8scmd get deployment | awk -vID="$k8sid" '$1 == ID')" ] ; then
  echo "Deployment not found"
  exit 0
fi
$k8scmd set image deployment/$k8sid container-1="$swr/$org/$app:$ver-$BUILD_NUMBER"
Note that this step will be skipped since there won't be any running pods. They are created later.
Up to here, we have a Jenkins pipeline that
- compiles a jar file
- creates a docker image
- pushes the image to the SWR for containers.
Test run the workload
Follow the steps as outlined Sample Workload. Select the image created by
the Jenkins Pipeline.
Updates to the source code will trigger a webhook that will start the Jenkins pipeline. The pipeline will update the running pod to the newly build application.