Linux Serial Consoles
Intro
In my previous article I went about adding a serial port to a NAS. The reason why this interesting to me is because it lets me remote manage my home servers at a fairly low level.
This works because I only use Linux for my home servers and only am interested in managing the Linux boot process which the serial port lets me do.
There are more powerful (and at the same more costly) alternatives for servers, such as:
- Management boards like DRAC, ILO, RSA. These are propietary to specific manufacturers, but they give the most control of managed servers and can be quite costly.
- IP based KVM. This also gives you full manageability while being an open solution. Systems like this can also quite expensive. The cheapest I found is Pi-KVM, however this solution is still more expensive compared to simply adding a serial port.
The big advantage of these more expensive solution is that these give you access to the BIOS menu and are compatible with graphical Operating Systems such as Windows.
Linux on the other hand can work fine with only a serial console. For Bootloader I use grub or syslinux which happily support serial consoles.
Note, that for this to work you either need a on-board serial port or a PCI/PCIe/ISA serial port. A USB to Serial converter will not work as they are not enabled early in the boot process.
In addition, for Virtual Machines, it is useful to configure them with serial console as these can be used early in the boot process of the operating system.
Specially for debugging early boot problems, simply capturing the output of the serial port as opposed to carefully watching the screen (be that physical or virtual) can be quite useful.
There used to be a line of products called PC Weasel. This was a line of graphics card that instead of output to a monitor they would output to a serial port. In addition to the graphics emulation, it would also provide keyboard emulation. It would be a manufacturer independent remote console. Unfortunately, they are no longer around.
Hardware
Serial ports can be found on many motherboards. They could either be standard DB-9 or DB-25 (very rare nowadays) or Cisco style console ports. For system that are not equiped with serial ports, adding a PCIe serial port is quite inexpensive (usually around 20EUR). However, these systems would need to have space for a PCIe card. I have seen serial port cards in M.2 format. I have not tested these.
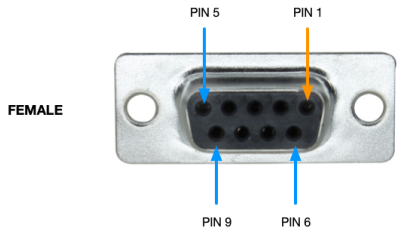
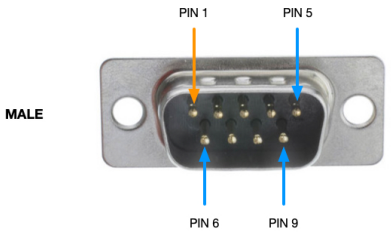
On PCs, usually ports use a male DB9 connector. This is an old convention related to DTE/DCE terminology. Back in the day, PCs were called DTE's (Data Terminal Equipment) and the standard for DTE is to use a Male DB9 (or DB25) connector for DTEs. The PC would connect to a modem. Modems were catagorized as DCE (Data COmmunication Equipment) and the standard for DCE is to use a Female DB9 (or DB25) connector.
Since we are connecting two PCs, we would have 2 male DB9 connectors on each end. Now, do NOT use a simple gender changer to connect the two. Unlike modern equipment that can automatically negotiate transmit and receive pins, serial ports require what is called a null-modem cable/connector. So a gender changer is not enough.
Null modem
Null modem is a communication method to directly connect two DTEs (computer, terminal, printer, etc.) using an RS-232 serial cable.
Wiring:
| Signal | One Side (DB9) | Signal Direction | Other Side (DB9) | Signal |
|---|---|---|---|---|
| Carrier Detect (CD) | 1 | ← | 4 | DTR |
| Received Data (RxD) | 2 | ← | 3 | TxD |
| Transmitted Data (TxD) | 3 | → | 2 | RxD |
| Data Terminal Ready (DTR) | 4 | → | 1 | CD |
| Data Terminal Ready (DTR) | 4 | → | 6 | DSR |
| Ground (GND) | 5 | - | 5 | GND |
| Data Set Ready (DSR) | 6 | ← | 4 | DTR |
| Request to Send (RTS) | 7 | → | 8 | CTS |
| Clear to Send (CTS) | 8 | ← | 7 | RTS |
Cisco style ports
Some motherboards and small form factor (SFF) systems come with a serial port in the form of a cisco compatible console port. These are nice in the sense that they can use a rollover cable which act as a null-modemm cable, so you can connect these ports back to back (with the right cable), in addition to being smaller than even a DB9 connector.
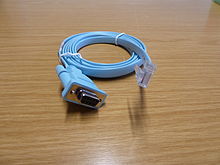
While sometimes the right adaptors are not readily availabke, you can buy DB9 to RJ45 adaptors that need to be wired (Example).
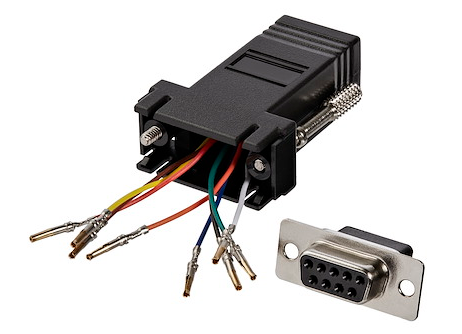
This is not difficult to do and once wired everything snaps into place.
The basic wiring is as follows:
| Signal | Color | RJ45 Pin |
|---|---|---|
| RTS | Blue | 1 |
| DTR | Orange | 2 |
| TxD | Black | 3 |
| GND | Red | 4 |
| GND | Green | 5 |
| RxD | Yellow | 6 |
| DSR | Brown | 7 |
| CTS | White | 8 |
For a female adapter, the wiring becomes:
| DB9 Pin | Signal | Color | RJ45 Pin |
|---|---|---|---|
| 1 | CD | N/A | N/A |
| 2 | TXD | Black | 3 |
| 3 | RXD | Yellow | 6 |
| 4 | DSR | Brown | 7 |
| 5 | GND | Red | 4 |
| 5 | GND | Green | 5 |
| 6 | DTR | Orange | 2 |
| 7 | CTS | White | 8 |
| 8 | RTS | Blue | 1 |
Alternative Pin-out for cross-connection.
| DB9 Pin | Signal | Color | RJ45 Pin |
|---|---|---|---|
| 1 | CD | N/A | N/A |
| 2 | RXD | Yellow | 6 |
| 3 | TXD | Black | 3 |
| 4 | DTR | Orange | 2 |
| 5 | GND | Red | 4 |
| 5 | GND | Green | 5 |
| 6 | DSR | Brown | 7 |
| 7 | RTS | Blue | 1 |
| 8 | CTS | White | 8 |
For a male adapter, the wiring meaning is reversed however the RJ45 to DB9 pin assignments are the same:
| DB9 Pin | Signal | Color | RJ45 Pin |
|---|---|---|---|
| 1 | CD | N/A | N/A |
| 2 | RXD | Black | 3 |
| 3 | TXD | Yellow | 6 |
| 4 | DTR | Brown | 7 |
| 5 | GND | Red | 4 |
| 5 | GND | Green | 5 |
| 6 | DSR | Orange | 2 |
| 7 | RTS | White | 8 |
| 8 | CTS | Blue | 1 |
Raspberry Pi serial ports
On a Rasbperry Pi, there is a serial port available in the GPIO header. The configuration of GPIO header is as follows:
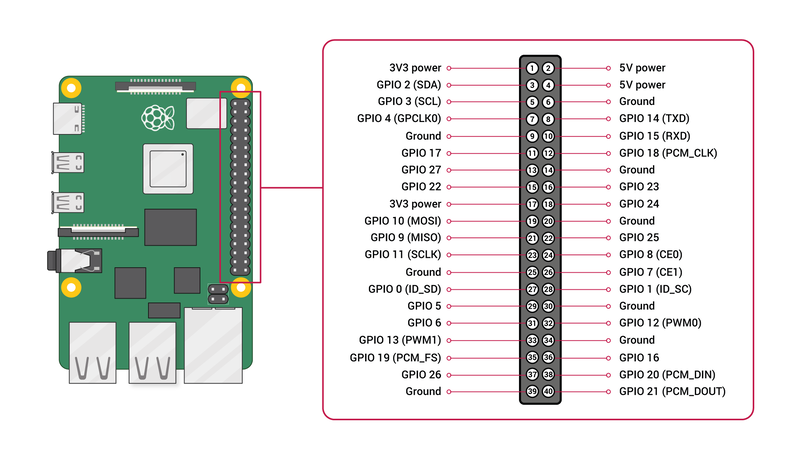
(See Raspberry-Pi GPIO)
For the built-in serial port is available on GPIO14 (TXD, pin8) and GPIO15 (RXD, pin10). In addition you would need to connect a ground signal. I would usually use the GND from Pin6 as is adjacent to the TXD,RXD lines. This is usually enough, however, if you are using a TTL to Serial level convert, you would need to connect a 5V power supply. In that case I would use Pin4 (again, because it is adjacent).
Note, the serial port in the Raspberry Pi is using TTL levels (3.3V). Do NOT connect directly to a standard serial port interface.
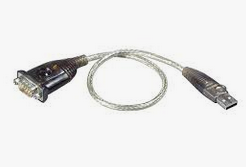
USB cables
While earlier I stated that using USB to Serial cables are not good for remote management, that is not the case for the systems being used as console. The reason is that in this scenario, we are using the serial port after the system is up and running and not during the early boot process. For that reason, for the console systems, USB cables are OK.
For me, I am using a Raspberry Pi 3B as a console server and/or a Windows laptop as as direct system console. For either use case, using the USB serial cable is OK.
In the case of Linux, after you plug in the serial cable, they will be shown to
the user as /dev/ttyUSBX. Where X is a number starting from 0 (zero).
In the case of Windows, the USB serial port are usually show as device COMN.
Where N is a number starting from 1 (one). However very often, USB port start
being numbered from 4 onwards.
For my console server use-case, I got a USB to 4 serial ports cable. I preferred to use this to using a USB-hub and having multiple USB to serial conversion because it makes it simpler when enumerating the serial ports.
Configuration
Boot configuration
Depending on the bootloader and your hardware you need to do certain configuration changes for the serial port to be available during boot.
grub config
If booting using grub you need the following configuration settings
in your grub.cfg:
serial --unit=0 --speed=115200
terimanl_input console serial
terminal output console serial
The first line configures the serial port to use. 0 (zero) is the first serial port. 1 for
the second serial port. Change this accordingly.
Similarly, --speed specifies the baud rate to use. In the example we are using 115200. Select
the appropriate speed. Common values are: 9600, 38400, etc.
The next two lines configure that input and output should go simultaneously to the display console and the serial port.
syslinux
To enable the serial port add the following line:
SERIAL 0 115200As in the previous example, we are using the first serial port (0) and setting the speed to 115200.
Raspberry pi configuration
For Raspberry Pi before the Pi3 the serial port is enabled by default. From the Raspberry pi an
onwards, you need to add the config line to /boot/config.txt:
enable_Uart=1In my case I am also using an UEFI boot loader for loading grub as the boot menu. If that is the case, the UEFI bootloader will recognize the serial port automatically. However the Linux kernel needs to be passed the following command line to enable the serial port:
8250.nr_uarts=1This is done automatically by the Raspberry PI firmware, but if you are using grub to boot Linux, make sure you add this to the kernel command line.
Linux configuration
The serial console can be configured using the kernel command line. See serial-console article.
By default under Linux, the current display and keyboard combination is the console.
You can redefine the console by adding the console command line option in the
Linux kernel command line. (See kernel options for all the options
available for the Linux kernel command line).
For the console, the following options are possible:
console= : Output console device and options.
console can be specified multiple times. The following options after the =
equal sign are recognized:
tty<n>Use the virtual console device<n>.
If<n>is zero0, it will use the current foreground virtual console.ttyS<n>[,options]ttyUSB0[,options]
Use the specified serial port. The options are of the form "bbbbpnf", where "bbbb" is the baud rate, "p" is parity ("n", "o", or "e"), "n" is number of bits, and "f" is flow control ("r" for RTS or omit it). Default is "9600n8".uart[8250],io,<addr>[,options]uart[8250],mmio,<addr>[,options]uart[8250],mmio16,<addr>[,options]uart[8250],mmio32,<addr>[,options]uart[8250],0x<addr>[,options]
Start an early, polled-mode console on the 8250/16550 UART at the specified I/O port or MMIO address, switching to the matching ttyS device later. MMIO inter-register address stride is either 8-bit (mmio), 16-bit (mmio16), or 32-bit (mmio32). If none of [io|mmio|mmio16|mmio32],<addr>is assumed to be equivalent to 'mmio'. 'options' are specified in the same format described for ttyS above; if unspecified, the h/w is not re-initialized.hvc<n>
Use the hypervisor console device<n>. This is for both Xen and PowerPC hypervisors.
If console is specified multiple times output will appear on all of them. The last device
will be used when you open /dev/console.
For example, normally I would use:
console=tty0 console=ttyS0,115200This would generate output on the current foreground virtual console and the first serial port.
The /dev/consoel device would be attached to the serial port.
If no console device is specified, the first device found capable of acting as a system console will be used. At this time, the system first looks for a VGA card and then for a serial port. So if you don’t have a VGA card in your system the first serial port will automatically become the console.
You will need to create a new device to use /dev/console. The official /dev/console is
character device 5,1.
Configuring getty
To enable logins on the serial port, make sure a getty runs it, so you can login once the
system is done booting. This is done by adding a line like this to /etc/inittab (exact syntax
depends on your getty):
ttyS0::respawn:/sbin/getty -L 0 ttyS0 vt100Booting Xen
When booting Xen, you need to pass the following parameters to the xen command line:
com1=115200,8n1 console=com1This configures the first serial port and makes it the Xen console. This effectively hides that serial port from Linux. Similarly the Linux kernel command line needs to have:
console=tty0 console=hvc0Finally, to enable logins add to /etc/inittab:
hvc0::respawn:/sbin/getty -L 0 hvc0 vt100When using xen on the serial port you can press CTRL-a three times to switch between
dom0 and xen input. In xen mode you have access to the low-level xen hypervisor.
Press h for help on available options.
The CTRL-a escape key can be configured from the xen command line
using option:
conswitch=<switch-char[x]
The default is:
conswitch=a
The optional x at the end means that xen will not switch to dom0 but remain
in xen input mode.
During run-time, you can change the escape key using:
xl set-parameters conswitch=kWhere k is the character you want to use as escape.
Change serial parameters
During run-time you can modify the serial port setting use the stty command:
stty -aWill display all available settings. You also check/set settings of a different serial port:
stty -a < /dev/ttyS1Resizing the console
When running interactive commands you may need to tell server the current size of your screen. This can be done with the command:
stty rows 25 cols 80We set the screen size to 80 columns, and 25 lines in this example. To automate this you can use this rsz script.
Accessing the Serial Console
To access the serial console you need a computer with a serial port and connecting it
to the serial port of the managed system. As mentioned above, you would normally
require a null modem to perform the connection.
Windows
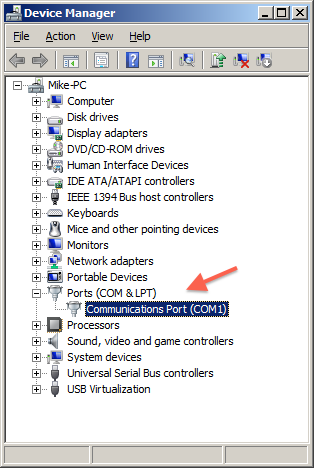
In Windows you can use putty. Either plug in a USB to serial converter or use an on-board serial port.
First determine the name of the port that the system allocated to the serial port using
device manager. The quickets way is to click on the Start button and type in
device manager. It may warn you that you are running as standard user. That is fine
as we only need to look up stuff, and not make any changes.
Expand Ports (COM & LPT), the serial adapter should be listed:
Alternatively you can use the mode command from the Windows command line.
Open PuTTY, and click Serial from the Category: Connection.
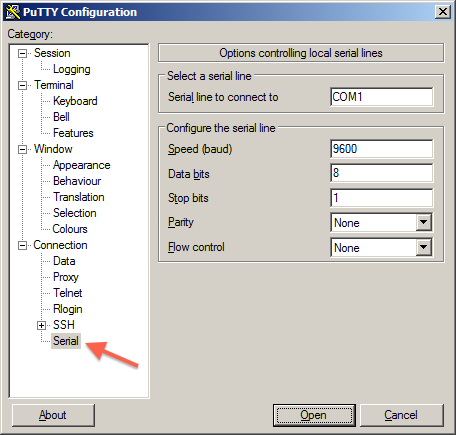
Edit the settings, eg: COM1, 115200, 8, 1, None. Flow Control: None.
Select the Category: Session, click the Serial radio button.
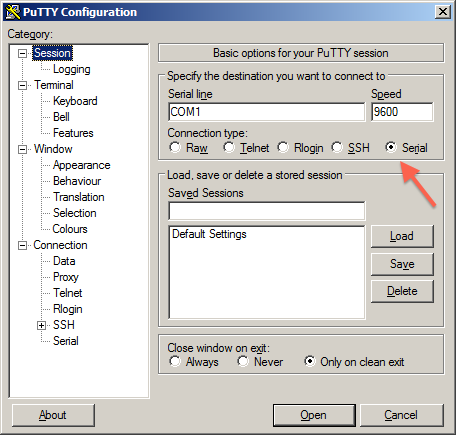
If you want, you may save the session.
Click Open to start the serail session.
Linux
The screen command can be used in Linux. Install screen if not already installed. Most distributions should have a package for it.
To find the serial port device you can:
ls /dev/ttyS*for on-board serial ports.ls /dev/ttyUSB*for USB serial ports.
You can now use the screen command to to establish a simple serial connection.
Type screen <port_name> <baud_rate> to create a connection:
screen /dev/ttyUSB0 115200The terminal will go blank with just a cursor. You are now connected to that port!
To disconnect, type control-a followed by shift-k. The screen will then ask if you are
sure you want to disconnect.
There are other options you can control from screen, however it is recommended that you
only use this method if you are comfortable with the command line. Type man screen for a full
list of options and commands.
To disconnect, type control-a then shift-k.
That's all there is to it.
tinyserial
I myself use an uncomplicated command called tinyserial. This is a barebones command that sets up the serial port and connects you to it.
My local copy can be found here.
Serial ports in VMs
Configuring serial ports when creating Linux VMs lets you monitor the VM boot process from the start.
- Configuring
- xen: enabled by default
- libvirt: Either add the following xml:
  <serial type="pty">
    <target port="0"/>
  </serial>
or via virt-manager UI.
- Connecting:
- xen:
xl console vmname - libvirt:
virsh console vmname
- xen:
Using GNU screen as Serial Console Server
You can use GNU screen mentioned earlier, to set-up a Serial Console server. For this Serial Console Server we have this functionality:
- Let you connect to a serial port via the network
- Log traffic over the serial port to a file
For this I am using a [Raspberry Pi]]rpi] with a multi-serial port USB adaptor. During system start-up I start GNU screen as a detached session and connect it to the serial port. Each serial port has a named session.
Using ssh I log-on to the system and use screen -r *SESSION* to re-attach to the
session. The GNU screen command also logs all serial port traffic to
a file.
To do this, I use the following options when starting screen:
-d -m: start the session in a detached/background state-L: turn on automatic output logging-Logfile file: and log to the given file.-S name: give the session a name (useful for re-attaching)
I usually start the session with this additional arguments:
/dev/ttyUSB0 115200,crtsctsThis set the given serial port to 115200 speed, and turns on RTS/CTS flow-control.
I also use the SCREENRC environment variable to specify an initialization file
with further configuration.