Using hooks in git

Here are some tips for using hooks in git.
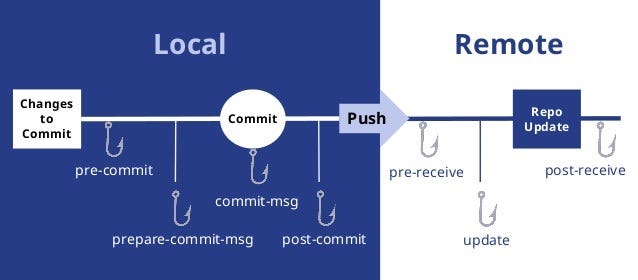
Like many other Version Control Systems, Git has a way to fire off custom scripts when certain important actions occur. There are two groups of these hooks: client-side and server-side. Client-side hooks are triggered by operations such as committing and merging, while server-side hooks run on network operations such as receiving pushed commits. You can use these hooks for all sorts of reasons. Typically these are used to customize Git for:
- automate tasks
- enforce policies through workflows
- ensuring code quality
- running test automation
Add additional files to commit
Take some files and create items that will be added to commit.
- Create script to generate meta data
- Create pre-commit hook
#!/bin/sh python generate_commit_artifacts.py git add path/to/generated/artifacts - Make hook executable
The use case for this is to include in the source code repository files that require specialized tools to generate.
List files that will be committed
In a pre-commit hook, you can use git diff to find the files that are staged for commit.
The git diff --cached command shows the changes between the index (staging area) and your
last commit, effectively listing the files that will be included in the next commit.
#!/bin/sh
# Pre-commit hook script to find staged files

# Get the list of staged files
staged_files=$(git diff --cached --name-only --diff-filter=ACMR)

# Print the staged files
echo "Staged files:"
echo "$staged_files"

# Run your script for each staged file
for file in $staged_files; do
    # Add your metadata generation script here
    echo "Processing $file"
    # Example: python generate_metadata.py $file
done
In this script:
git diff --cached --name-only --diff-filter=ACMRlists the names of the files that are staged to be committed. The--diff-filter=ACMRoption filters the results to include only Added (A), Copied (C), Modified (M), and Renamed (R) files.staged_filesstores the list of these files.- The script then loops through each staged file and performs any desired actions, such as running a metadata generation script.
By using this approach, you can ensure that your pre-commit hook processes only the files that are actually staged for the next commit. This helps in generating and committing relevant metadata efficiently.
Making hooks available
To ensure that your hooks are available when someone forks your repository, you can include the hook script within your repository itself and provide instructions on how to set it up. Here's a recommended approach:
- Create a Directory for Hooks: Inside your repository, create a directory named
something like
githookswhere you can store your hook scripts. - Store your Hook script: Place your hook scripts in this directory, make sure they are executable.
- Updated Hooks: In the root directory of your repository create or update
a setup script (e.g.,
setup-hooks.sh) that will install your hooks in the appropriate.git/hooksdirectory.#!/bin/sh # # setup-hooks.sh # cd "$(dirname "$0")" || exit 1 ls -1 githooks | while read hook do [ -x "githooks/$hook" ] || continue ln -sf ../../githooks/"$hook" .git/hooks/$hook done -
Include Setup Instructions: Add a section in your
README.mdor create a separateCONTRIBUTING.mdfile to include instructions for setting up the Git hooks:## Setting Up Git Hooks To set up the Git hooks for this repository, run the following command: sh setup-hooks.sh
By following this approach, anyone who forks your repository can easily set up the repository hooks by running the setup script. This keeps the process simple and ensures that everyone working with the repository has the necessary hooks in place.